How to install Magento 2 on Cloudpanel that runs on Oracle Cloud with Ubuntu 22.04 (Nginx)?
Installing Magneto is a bit complex process, when I try to install Magento on the Cloudpanel control panel that is hosted on Oracle Cloud with Ubuntu being the operating system. I have many errors and obstacles, it took me days to figure out and troubleshoot all the issues. I am creating this blog post if you guys are trying to do the same thing and are stuck, if you follow every step correctly and orally you will succeed.
Step 01
I assume you have no trouble with installing the OCI VM instance and setting the correct setting. If you have a question feel free to comment.
Step 02
Installing Cloudpanel on a VM instance is not a big deal you can follow the instructions on the below link if you have any issues.
https://www.cloudpanel.io/docs/v2/getting-started/oracle-cloud/installation/installer/
Step 03
Add your website to Cloudpanel and create a user and database, Note down your...
Username and password for your domain name
Database name
Database User name and password
Also, make sure your domain's DNS records are pointing to your server's IP
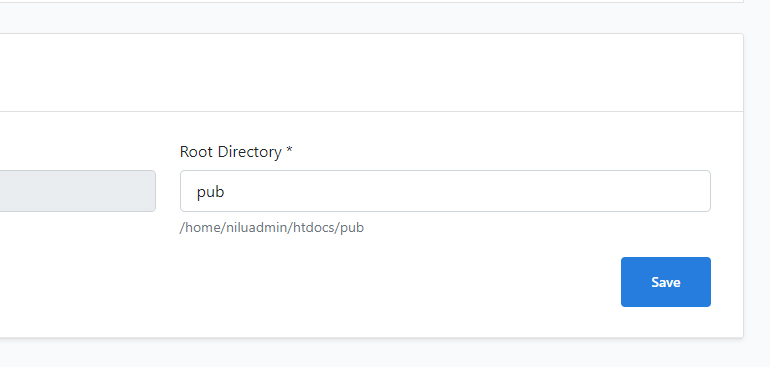
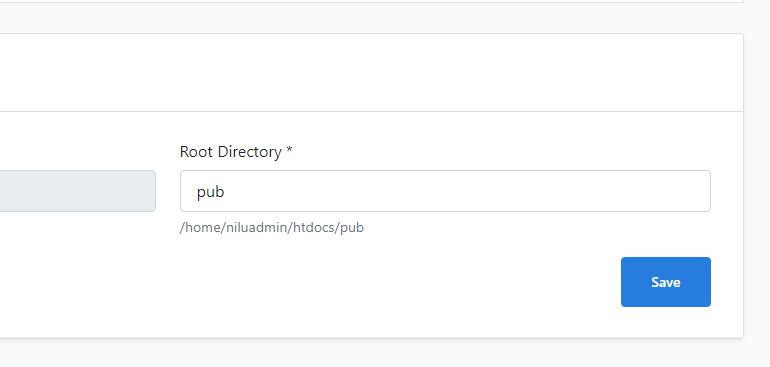
also change your root folder like below

Follow the below link's instructions for further information.
https://www.cloudpanel.io/docs/v2/frontend-area/add-site/
Step 04
Install Java Development Kit
Log in to your root via SSH and run this command
sudo apt install default-jdk
Step 05
Now install Elasticsearch
Download and install the public signing key:
wget -qO - https://artifacts.elastic.co/GPG-KEY-elasticsearch | sudo apt-key add -
Installing from the APT repository
You may need to install the apt-transport-https package on Debian before proceeding:
sudo apt-get install apt-transport-https
Save the repository definition to /etc/apt/sources.list.d/elastic-7.x.list:
echo "deb https://artifacts.elastic.co/packages/7.x/apt stable main" | sudo tee /etc/apt/sources.list.d/elastic-7.x.list
Now You can install the Elasticsearch Debian package with:
sudo apt-get update && sudo apt-get install elasticsearch
Important : Now run this command:
sudo systemctl start elasticsearch.service
Configuring Elasticsearch
By default, Elasticsearch boasts that it’s default settings are good to go straight “out-the-box”. However, this is subject to some optimisation tweaking Which we’ll do now.
Let’s start by opening the Elasticsearch configuration file using:
sudo nano /etc/elasticsearch/elasticsearch.yml
There are 3 thing we want to change in this file whilst we have it open:
Updating the Cluster Name
Using your arrow keys, find the line that contains cluster.name . Once you’ve located it, first delete the preceding “#” and then replace “my-application” with something descriptive like “Magento Cluster”.
Updating the Node Name
Now do the same with node.name , remembering to delete the preceding “ # ” and then replacing “node-1” with something descriptive like “Magento Node”.
Updating the Network Host
Finally do the same with network.host , replacing the IP (“192.168.0.1”) with “localhost”. Don’t forget to delete the preceding “#” like we did with the others.
Now save your changes and exit the nano editor by pressing Ctrl+X to exit, Y to save and Enter to confirm.
Reload your changes
In order for those 3 changes to take affect, reload the Elasticsearch service by running: [27:58]
sudo systemctl restart elasticsearch
Final Test of Elasticsearch
Now let’s run a final check to ensure the changes took affect and that we didn’t break anything. Remember, can do this by entering:
curl -X GET 'http://localhost:9200'
And as you can see, the Name and Cluster name now reflect those changes.
{
"name" : "Magento Node",
"cluster_name" : "Magento Cluster",
"cluster_uuid" : "7ymV1F7HTw2RuScEDaimvQ",
"version" : {
"number" : "7.6.0",
"build_flavor" : "default",
"build_type" : "deb",
"build_hash" : "7f634e9f44834fbc12724506cc1da681b0c3b1e3",
"build_date" : "2020-02-06T00:09:00.449973Z",
"build_snapshot" : false,
"lucene_version" : "8.4.0",
"minimum_wire_compatibility_version" : "6.8.0",
"minimum_index_compatibility_version" : "6.0.0-beta1"
},
"tagline" : "You Know, for Search"
}
Follow below link for information
https://www.elastic.co/guide/en/elasticsearch/reference/7.9/deb.html
Step 06
Adding user - Important
Make the web server group the primary group for the new user
sudo usermod -g www-data magento
Make sure to replace "magento" with the actual user that you created on Step 03 (Username for your domain name)
Step 07
Folder permissions
When we installed Apache, it automatically created a web directory to store web files. However, it will have created this under the default user known as www-data (or even root). So, we need to update the permissions for that directory. This will allow our new Magento user to operate correctly.
Update the folder ownership and group to coincide with our new web user
sudo chown -R magento:www-data /home/niluadmin/htdocs/
Just make sure you add the correct path to your folder. Refer to the image below
Step 08
Install Composer
Install Composer by downloading the file direct from their website
sudo curl -sS https://getcomposer.org/installer | php
Move the composer file to the required directory
sudo mv composer.phar /usr/local/bin/composer
Download Magento via Composer
Now, it’s time to use composer to download Magento 2.4.5-p1.
We first need to navigate to the web directory of our web server
cd /home/niluadmin/htdocs
Now, we need to switch from our superuser to the magento user that we created a step 03
su magento
In order for Composer to work, it needs to be ran from within an empty directory – Otherwise it’ll generate an error. (Important)
We can verify this by listing all file and folder inside the directory
ls -la
So let’s delete that test file
rm index.html
So, let’s now tell composer to install the latest copy of Magento – Make sure you don’t miss the Period at the end of the command. This insignificant looking dot tells composer to install it in the same directory from where we are running the command from. Missing this dot will cause Magento to install somewhere else
composer create-project --repository-url=https://repo.magento.com/ magento/project-community-edition .
Note: This command will load the latest version of Magento.
During the setup, you will be asked for a Username and a Password. Just to be clear, Username = Public Key and Password = Private Key. We talked about obtaining these from your Magento Marketplace Account at the beginning of the video.
Once underway, the composer process can take anywhere from 5-10 minutes to complete.
Set pre-installation permissions
You should now see a screen similar to this, where Putty is waiting for my next command. This is when we want to take a moment to set the necessary file permissions for Magento to run correctly.
This next command looks like a long one, but it is 4 commands strung together – This will save us from putting each command in one at a time
find var generated vendor pub/static pub/media app/etc -type f -exec chmod g+w {} + && find var generated vendor pub/static pub/media app/etc -type d -exec chmod g+ws {} + && chown -R :www-data . && chmod u+x bin/magento
You’ve now ensured that Magento can now access all the necessary folders and files.
Run Install Script
This is the point, where we get to run the Magento Installation Script. Use this example as a template and change the values where appropriate.
Edit the parameters like key, db-host, db-name to your needs.
NOT the (key='18Av6ITivOZG3gwY1DhMDWtlLfx1spLP') Keep it exactly same
php8.1 bin/magento setup:install --backend-frontname='admin' --key='18Av6ITivOZG3gwY1DhMDWtlLfx1spLP' --session-save='files' --db-host='127.0.0.1' --db-name='magento2' --db-user='magento2' --db-password='magento2' --base-url='https://www.domain.com/' --base-url-secure='https://www.domain.com/' --admin-user='admin' --admin-password='!admin123!' --admin-email='john@doe.com' --admin-firstname='John' --admin-lastname='Doe'
Update memory_limit
Do it from your Cloudpanel Settings -> PHP Settings - memory_limit
Install cron tasks
Next we need to set up our cron tasks. These are scheduled tasks that are required to run in the background. They assist with tasks like Indexing, Backups, Updates and so forth.
Luckily, this can now be setup by running one command
bin/magento cron:install
Step 09 - Important
At this point, unless your server has a running Email sever you will be stuck at Magento 2 Two-Factor Authentication when you try to log into Magento admin panel, Now run below two commands to bypass 2 Two-Factor Authentication.
bin/magento module:disable Magento_AdminAdobeImsTwoFactorAuth
bin/magento module:disable Magento_TwoFactorAuth
Step 10
Install Sample Data
If you want to install Sample Data follow the below Commands in the correct order.
bin/magento deploy:mode:set developer
Clear the cached generated folders
rm -rf generated/metadata/* generated/code/*
Clear the remaining cache
bin/magento cache:clean
bin/magento sampledata:deploy
bin/magento setup:upgrade
Now, when we refresh the Frontend and Backend, you can see what Magento now looks like with Sample Data.
That's it congratulation you have successfully install Magento 2 on Nginx webserver
How to install Magento 2 on Nginx, Cloudpanel that runs on Oracale Cloud with Ubuntu 22.04
